


From Idea to Action: Are You Implementing Your Good Ideas or Leaving Them Behind?
“Hey, Listen!”, my daughter said, while peeling an orange, “I was surprised the other day when my friends could not relate to when I said that I eat fruits every day”.
We were all amused at the dining table. Indeed, we have been infinitely consistent with eating dry fruits and fresh fruits, every morning! While chatting further we concluded that the credit went to my wife who has been meticulous in getting the right portions cleaned and set on the dining table for all of us. It was not enough to keep the refrigerator well stocked.
In a gathering, you ask people to raise their hands if they believe in the value of fruits in their diet. I am sure most will raise their hands. But if you ask, next, how many of them were able to consume fruits every day, probably many hands will go down.
I think this is what happens with all the good things. It’s not enough to know that they are suitable for our well-being. We need a set of rituals or a system that makes us apply them in life at the right time and place.
A case in point is that there are several personal productivity ideas that are being told for several generations, but we miss applying them simply because we lack a foolproof system where these ideas are tightly built-in.
Look at these:
- Plan for the day in the morning.
- Plan Your Week’s Schedule, ahead!
- Block out your calendar.
- Be well prepared for the meetings.
- Have some thinking/brainstorming time.
- Obtain clarity!
- Eat the frog!
- Delegate your work and manage delegated tasks.
- Be organized with your work.
- Focus on only a few goals at a time.
- Don’t lose sight of long-term goals.
- Set Aside Time for Breaks.
- Write your journal every day.
- Start early and go slowly.
- Don’t multitask.
- Ensure quality in the outputs.
- Deliver outputs on time.
- Stay consistent in all that you do.
- Set priorities.
- Utilize peak-productivity hours for important tasks.
- Learn from successes as well as mistakes.
- Manage your energy (not just time).
- Get better at saying “no”.
- Plan before you act.
- Don’t just plan, you should act too.
You will agree with every one of them. But, if I ask if you have a foolproof system that builds all these together to keep you productive and stress-free, I am sure, most of you will even be surprised if such a system could even exist. The GTD (Getting Things Done) methodology precisely offers you this.
Be it, your health, your diet, productivity habits, or anything else. It’s not enough to know what’s good for you. You will have a chance to succeed with them, only if you build them into rituals or a system.
(Originally published in the Times of India on February 12, 2023)
Photo by Mark McCammon: https://www.pexels.com/photo/black-kettle-beside-condiment-shakers-and-green-fruits-and-plants-on-tray-on-brown-wooden-table-1080696/
Subscribe to my newsletter, to get tips like this and more, directly in your inbox!

What They Don’t Teach you about Eisenhower Matrix
The Eisenhower Matrix is an incredibly popular topic on LinkedIn, as evidenced by the numerous search results it generates. Check this 99th page of the search results on LinkedIn, if you don’t believe it.
However, many people still view it with awe, without fully realizing its potential. Before delving into the lessons to be learned from the matrix, let’s briefly recap its structure:
Similar to other matrices, the Eisenhower Matrix consists of two axes that represent distinct task characteristics: Urgency and Importance. The vertical axis comprises two values, Important and Not Important, while the horizontal axis encompasses Urgent and Not Urgent. These combinations result in four quadrants:
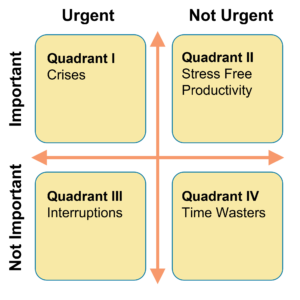
Quadrant I: Important and urgent tasks, like, crises management
Quadrant II: Important, but not urgent tasks, like preventive measures
Quadrant III: Urgent, but not important tasks, like interruptions
Quadrant IV: The tasks that are neither urgent nor important, like entertainment
In my experience, I have encountered individuals who struggle to grasp the concept that certain tasks can be important without being urgent. Unfortunately, our work environment has fostered a mindset where we tend to equate importance with urgency!

Let’s Troubleshoot Your To-do List
To do list or not to do list was never a question!
As such, our working memory is too shallow to hold all that we must be doing and wish to do. To worsen the matter, the world around us keeps changing faster than we can cope with, in both predictable and unpredictable ways. A well-maintained to-do list only can get you an up-to-date snapshot of your rapidly changing work universe!
To-do lists are not new. I have been seeing my dad using it since I got senses! He always carried a small diary to keep adding and striking off the items on his list. What might have changed since then is that today one could use Apps to manage the to-do list.
But then, or now, to-do lists have been largely useful as a one-off phenomenon. As soon as you start using a to-do list as a system for work management over the long term you would face several troubles with it! Let’s see which of those you could relate to:
1. You end up with multiple to-do lists –
This is the most common scenario. You end up having several of them and since you don’t know which one of them is fit for use, you start fresh, and uh-oh, you added fuel to the fire!
2. All to-do lists even when put together you are sure it doesn’t cover 100% of your work –
This is the most serious issue. One needs to have confidence in their to-do list to rely on it and use it. A partial list will never give that confidence.
3. Your to-do list is a crazy mix –
It could have very small tasks and very large tasks as well. Too small items just bloat your list and make it difficult to work with. On the other hand, too large tasks typically lack clarity on what needs to be done and so they linger around leading to procrastination.
4. Your To-do list has become too long to review and use meaningfully –
Working with a small to-do list can even be fun, but as your to-do list grows, you start missing your items in the nooks and crannies of your long winding to-do list.
5. Your criteria to pick a task from the to-do list is ad-hoc –
It’s one thing to pick a task from your to-do list and get busy with it and it’s another to pick a task that could be called the best usage of your that time slot. You need a mechanism to choose a task by keeping the size and quality of the time slot at your disposal, which a vanilla to-do list may not offer.
6. There is no way to track delegated tasks that are struck off from your list –
Another peril of having short working memory is that your delegates forget the task assigned by you to them. And, now that you have struck off that item from your list you don’t have a way to track the progress.
7. There is no way to track completed tasks for reflection –
When you finish something worthwhile, it’s always good to do a reflection on the process and quality of the deliverable for optimizing for the future. Again, a vanilla to-do list does not offer any mechanism to do this.
If you are abandoning your to-do list for one or more of these problems, you are throwing the baby with the bathwater. There is no alternative to a to-do list till either humans evolve to get better working memory or Singularity arrives!
Meanwhile, you should build a little system around your to-do list to overcome the limitations. Here are the complete details:
- To establish an effective task management system, begin by creating a comprehensive Master to-do list. Choose a single location, such as a notebook or spreadsheet, to maintain this list, ensuring it remains updated at all times, regardless of its size.
- Employ the 2-minute rule for tasks that require less than 2 minutes to complete. Instead of adding these tasks to your to-do list, promptly finish them right away.
- When adding large tasks or goals to your to-do list, avoid including them as they are. Instead, break them down into smaller, manageable subtasks and then add these to your list. Additionally, consider attaching a relevant category name to each granular task to maintain contextual clarity.
- Regularly review your Master to-do list over the weekend to extract relevant tasks for the upcoming week. Focus solely on this extracted subset, creating a dedicated weekly to-do list for the week ahead. Each day, review your weekly to-do list and compile a concise DAILY to-do list, concentrating solely on the tasks outlined for that specific day.
- Any new tasks that arise should be promptly added to your Master to-do list. If they are pertinent to the ongoing week, include them in your current week list as well.
- Rather than striking off delegated tasks, maintain a separate section to track these tasks until they are returned to you. Additionally, consider keeping a journal to document completed tasks. Utilize this reflection time to improve and refine your task management system.
The best utilization of your time is not just for productivity, but for also staying stress-free and healthy and enjoying that precious life beyond work!
Subscribe to my newsletter, to get tips like this and more, directly in your inbox!
(Originally published in Times of India on Oct 23, 2022)

What is 5G of Time Management?
When we see successful people around us, we want to be like them. We too want to attain the heights that they have attained. Obviously taking inspiration from them is a great thing but it is often seen that we do not end up duplicating their success.
Why does this happen? By doing what we too can always be victorious and successful?
I believe that there are usually three levels of hurdles.
The hurdle at the first level is this. All our attention is focused on the glory of their success and we end up ignoring the hard work put in by the successful people to achieve it. It’s not easy to have and maintain fitness like Akshay Kumar or Suniel Shetty have. Everyone likes to have that chiseled body, but not everyone is ready to take the painstaking effort that is required to achieve it.
It’s not just about physique, whatever field, you want to shine in, you should ensure that you are ready to do the hard work required to achieve it. The bottom line is whenever we see wild success, our attention should also go to the agonizing pain that brought it.
Now once we have made up our minds that we are going to work hard and also start doing it, there comes the hurdle of the second level! When we do not get that success even after a lot of hard work, we start getting frustrated, especially, when we are very close to the destination. And we may abandon the pursuit.
It is told that the superstar actor of yesteryears, Dharmendra, got frustrated after many years of struggle to become an actor and boarded the train to go back to his hometown and even the train started moving. It was at that time that he got his first break. He was pulled down from the moving train with his bags and he gave his first superhit movie and as they say, the rest is history.
When people hear such stories, they think of “luck”. It is never luck. It is your hard work that leaves its footprints and looking at them people find you.
Now that you are past the two hurdles as you understood the importance of hard work and also resolved that you would not give up, easily, there comes the hurdle of the third level.
“Oh man, I want to do it, but I just don’t have enough time.”
It happens. When you want to do many things, you face a shortage of time. But then, time is such a thing that you couldn’t get more. Everyone gets only 24 hours, every day. So here comes the importance of time management.
As we are evolving, the nature of work is changing. And as the work changes the method of time management should also change. Your time management should be according to the needs of today’s era. A farmer of agricultural age needed just a little more than a rooster to manage his time. Can the same method work now?
The concept of generations is made popular by the cell phone network – 2G, 3G, 4G, and 5G. If you ask me what 5G of time management could be, I would say this:
A choc-a-block calendar is a thing of the past. Time management 5G is about having a sparse calendar with only the time-sensitive tasks booked in it. The rest of the tasks are picked up flexibly, allowing the spontaneity to pick a task that suits the size and quality of the free time slot. This is possible only when you maintain a full inventory of your tasks in a smart to-do list. The smartness of a to-do list lies in how well it allows you to filter to get to the smaller subset that matters for your current day or the week.
Maintaining your to-do list to have 100% of your tasks is also not easy. You need the right techniques to ensure that. An incomplete to-do list will marginally be better than not having it at all. All this should be part of 5G of time management.
With the right attitude towards the work and the reward and the sophisticated time management system, no goal should be unachievable!
(Originally published in Times of India on October 07, 2022)
Subscribe to my newsletter, to get tips like this and more, directly in your inbox!

How To Plan Your Day for Stress-free Productivity
Thou shalt plan your day before you get on to your work.
Simple and profound, right? No one would disagree! And since it’s easier said than done, this too goes in cold storage like many other such commandments.
There are practical difficulties, most of which arise from the two basic facts that our mind is not good at remembering the work and the world around us changes too fast. You may not remember what priority for the day is. Or you may decide on one thing, but you may not be sure if that’s the best use of your time or if you are missing something. Or you plan but couldn’t follow it because of a sudden change in priorities.
You will need a robust system behind this to make it work for you! The premise behind this approach to daily planning is that, given the dynamics of today’s business world, it is impossible to follow a tightly planned daily schedule. However, that doesn’t mean that one should not plan, but it means that you have to make a flexible plan for the day so that it doesn’t break with small distractions.
- Make your calendar sparse: Your calendar should contain day/time-sensitive tasks only. These are the appointments, that you couldn’t snooze. So, for example, reading a report is a strict no-no for a calendar.
- Make a to-do list: All the goals and tasks other than what went into the calendar should be put on a to-do list, preferably a digital one. You don’t need anything fancy. A regular spreadsheet app is good enough. The only care you need to take is that just one spreadsheet should be the single version of the truth of your work. You might consider using it from the cloud so that it is available from all places where you could be.
- Weekly planning: Every weekend, you would need to spare 30 to 45 minutes to go over your to-do list and identify the probable candidates for the coming week. You need to be more practical here than wishful.
- Daily planning: Now that you have your sparse calendar and the week-specific to-do list, you are well-equipped to do the daily plan. Your calendar shows you the slots that are already booked for you for the day and which are non-negotiable. You need to find the remaining slots for the work items from your to-do list, factoring in your calendar items, lunch, and other breaks. You would extract the day-specific to-do list, from your week-specific to-do list, based on the time slots you have and the priorities.

Let us make you oops-proof
The human mind is quite peculiar: it’s brilliant at connecting ideas and generating interesting thoughts, yet it often struggles to remember them. If you want to act on those ideas later, you must develop the habit of capturing them in one designated place. This is especially important because we often get our best ideas when we’re away from our desks. That’s why it makes sense to have this “single designated place” on your smartphone.
The idea is to quickly collect these thoughts in a mobile app before they slip away, and then process them later when you’re back at your desk. While there are many apps for this, you need something lightweight that allows you to add an item quickly, without unnecessary steps. Google Keep is a great option, known for its simplicity and effective features.
Google Keep is available for both iOS and Android, and it also has a browser version so you can access your lists interchangeably from your computer. Setting up the app is easy—just create a list called something like “Catch All,” where you’ll store everything: tasks, ideas for social media posts, things to buy, or something to research later.
The next step is to establish a ritual, preferably in the morning, to process your “Catch All” list at your desk. While you may complete some tasks immediately, the main goal is to sort them. Some items might go on a to-do list, while others may land in separate lists, like writing ideas.
Once you have Google Keep, you can use it for other purposes too. Here are a few ideas:
- Meeting agenda items: Maintain a running list for quick reference during meetings.
- Meeting actions: Capture actions from meetings and process them during your morning routine, just like the “Catch All” list.
- Errands: If you’re not out and about frequently, keep a list of things to do when you’re out so you can maximize productivity.
- Checklists: Create recurring checklists for things like monthly payments or travel packing.
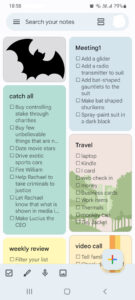
For better organization, you can set different colors or backgrounds for your lists, making it easier to find what you need quickly. And don’t forget to pin your “Catch All” task list at the top for easy access and smooth operation. You can even reorder lists, keeping the most important ones at the top.
This simple setup, combined with the habit of consistently capturing and processing your thoughts, will go a long way in helping you stay ahead of your responsibilities and remain stress-free.
Subscribe to my newsletter, to get tips like this and more, directly in your inbox!
(Originally published in Times of India on September 10, 2022)